Introduction

Replacing your bicycle brake pads is a straightforward process that can significantly improve your bike’s braking performance. Whether you’re a seasoned cyclist or a beginner, following this guide will help you replace your brake pads efficiently and safely.

Tools You Will Need

Before you start, make sure you have the following tools:

  • Allen wrench set
  • Needle-nose pliers
  • Flathead screwdriver
  • New brake pads

Step-by-Step Brake Pad Replacement Guide

Step 1: Remove the Wheel

First, remove the wheel to access the brake pads. Use an Allen wrench to loosen the bolts holding the wheel in place.

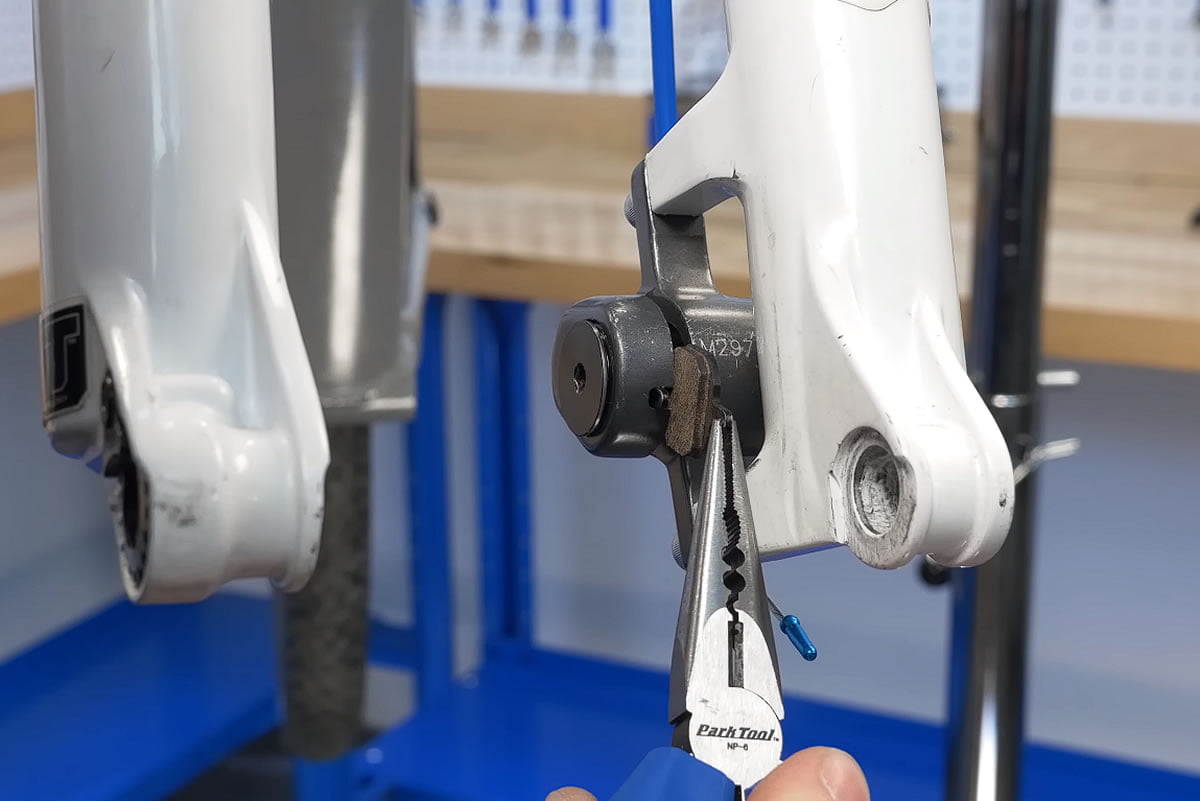
Step 2: Remove the Old Brake Pads

Using needle-nose pliers, carefully remove the old brake pads from the brake caliper. Be sure to take note of how they are positioned.

Step 3: Install the New Brake Pads

Insert the new brake pads into the caliper, ensuring they are aligned correctly. Secure them in place with the retaining clip or pin.

Step 4: Reattach the Wheel

Place the wheel back onto the bike and tighten the bolts using an Allen wrench. Ensure the wheel spins freely and the brake pads do not rub against the rim or rotor.

Step 5: Test the Brakes

Squeeze the brake lever to ensure the new pads engage correctly with the wheel. Adjust the brake cable tension if necessary.

Top 5 Signs Your Bicycle Brake Pads Need Replacing

  1. Squealing or Grinding Noises
    • Unusual noises when braking often indicate worn brake pads.
 
  1. Reduced Braking Performance
    • If you notice a decrease in braking power, it’s time to check your brake pads.
 
  1. Visible Wear Indicators
    • Most brake pads have wear indicators. If they are worn down, replace the pads immediately.
 
  1. Glazed or Cracked Pads
    • Inspect the brake pads for glazing or cracks. These signs indicate the pads need to be replaced.
 
  1. Brake Lever Feels Spongy
    • A spongy brake lever can be a sign of worn pads or air in the brake system.

Maintenance Tips for Bicycle Brake Pads

Regular maintenance of your brake pads ensures optimal performance and extends their lifespan:

  • Inspect regularly: Check your brake pads every few weeks for signs of wear.
  • Clean your pads: Keep them free of debris and contaminants.
  • Adjust brake tension: Ensure the brake pads are aligned correctly and engage smoothly with the wheel.

Conclusion

Knowing how to replace your bicycle brake pads and recognizing the signs that they need replacing is crucial for safe and efficient riding. Regular maintenance will ensure your bike performs at its best and keeps you safe on the road.